
Degugging embedded software is not easy. There is no terminal to display what is going on. Engineers need to implement smart mechanisms to visualise the flow of their code and spot errors without impacting the performance and functionality of the original software. The simplest techniques used in embedded debugging are blinking LEDs and UART logging.
Using LEDs to debug code is easy (you just have to change on/off state of an output PIN). Unfortunately the information that a LED can provide is very limited: you can only play with the number of blinks and the duration of those blinks. In practise, you can use a LED to indicate when the code passes by a certain point or when the internal state of the program changes to a given value. However it is difficult if not impossible to see what the value of a variable is or what the actual flow of the code is.
UART logging removes the limitations of LED debugging. You can print to the UART port/connection whatever you want: text, numeric values, variables, line numbers, etc. However there is an important drawback. Setting up and using a UART connection requires lots of resources and processing time from the hardware platform. In many scenarios this is not compatible with the real time requirements of the original program. For example, if you are in the middle of a Bluetooth connection and need to log a long message, the Bluetooth functionality cannot be put on hold while the message is being printed to UART(tenths of a second).
Although Nordic nRF51822 Bluetooth Low Energy firmware implemented in their Software Device can cope with the delays of a UART connection, the timing implications are not negligible. In one real example we experienced accumulated delays in our code of more than 5 seconds.
Real Time Terminal (RTT)
Fortunately SEGGER has implemented a debugging/logging mechanism similar to a UART connection but that uses much less resources. It is called Real Time Terminal and is included as part of the J-Link software suite. It uses the Serial Wire Debug (SWD) protocol and pins.
Quoting SEGGER documentation: "The performance of SEGGER RTT is significantly higher than any other technology used to output data to a host PC. An average line of text can be output in one microsecond or less. Basically only the time to do a single memcpy()"
Similar to UART, RTT can print strings, values and variables using API functions like SEGGER_RTT_printf() or SEGGER_RTT_Write(). The output of these functions can be viewed on the PC terminal or logged to a text file using J-Link RTT Viewer application. RTT enables bidirectional communication, so it can also be used to input data to the embedded code (e.g. change the value of a configuration parameter in real-time without having to recompile and reflash the code). Due to the performance of the protocol, RTT can be used to do real time debugging even with the extrict timing constraints of Nordic's SoftDevice.
The rest of this post asumes that you are using eclipse+gcc development toolchain for nRF51822. We will build on the installation that we detailed in the linked post, but you can easily use RTT in other environments like Keil as explained in Nordic's tutorial.
Connecting J-Link to nRF51822
Last week we attended a Bluetooth SIG seminar to learn about Bluetooth Developer Studio and we got a free Nordic nRF51 Development Kit. This kit already includes a SEGGER chip and supports RTT off the self using the USB connection for the communication between the PC and the nRF51822 chip. Once connected to the PC, open J-Link RTT Viewer application.
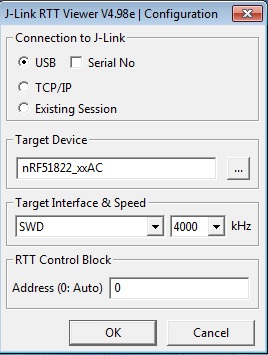
If you are using a standalone nRF51822 module such as BLE Nano, you should wire J-Link to the module as explained in this post before connecting it to the PC.
In both cases you need to tick USB as the Connection to J-Link optionin RTT Viewer launch window.
Adding SEGGER RTT libraries to the project
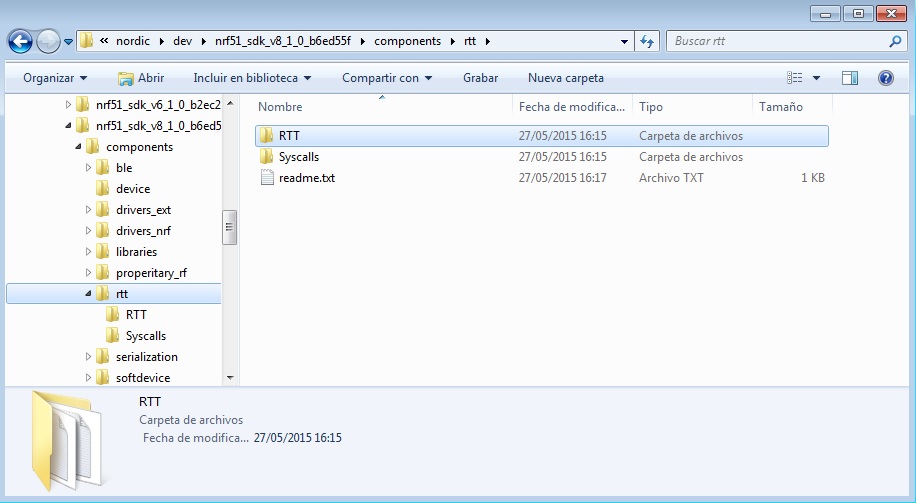
Download the RTT library files from SEGGER site and unzip them into a folder of your computer. We have chosen C:\nordic\dev\nrf51_sdk_v8_1_0_b6ed55f\components\rtt , but it could be any other folder.
We will use ble_app_uart example from the nRF51 SDK (C:\nordic\dev\nrf51_sdk_v8_1_0_b6ed55f\examples\ble_peripheral\ble_app_uart\) We have to update the project makefile so that the RTT library can be used from the application. Open the file and update the following elements:
- Update
C_SOURCE_FILESvariable and add these two files:
../../../../../../components/rtt/RTT/SEGGER_RTT.c \
../../../../../../components/rtt/RTT/SEGGER_RTT_printf.c \
* Update INC_PATHS variable and add this path:
INC_PATHS += -I../../../../../../components/rtt/RTT
Now we are ready to go.
Update the project code and include RTT logging/debugging code
Open the main.c file of the project and include the RTT library:
#include "SEGGER_RTT.h"
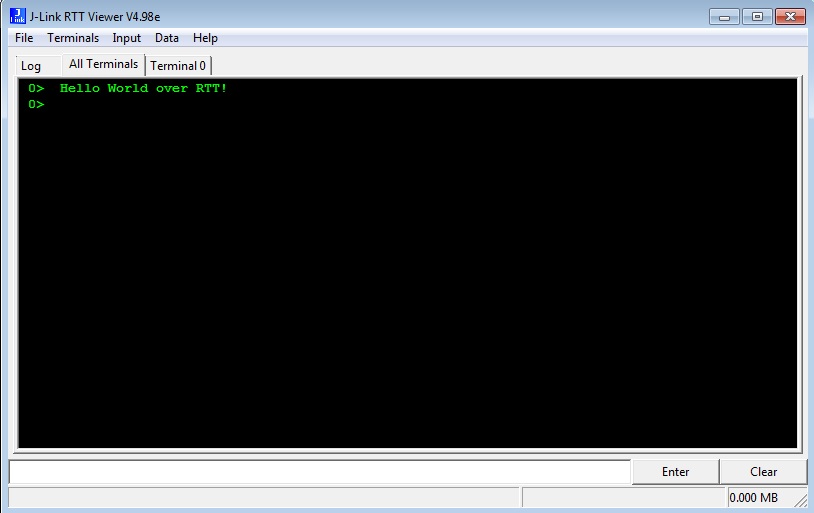
The library does not require initialisation, so it can be used straight away. In our case, we can output a constant string at any point of your code.
SEGGER_RTT_WriteString(0, "Hello World over RTT!\n");
This string will pop up displayed in the J-Link RTT Viewer when the code is executed
The logging possibilities of RTT are very powerful thanks to the SEGGER_RTT_printf method. For example, we have added RTT logging to the UART service so that data is logged in RTT VIewer when new data is received over BLE.
The app uses ble_nus service (nus stands for Nordic UART Service) and is stored at C:\nordic\dev\nrf51_sdk_v8_1_0_b6ed55f\components\ble\ble_services\ble_nus\ble_nus.c
New data is received when the client writes to the RX characteristic which happens in the on_write method. Data is received in buffer p_evt_write->data and the length of written data is stored in p_evt_write->len. Two calls to SEGGER_RTT_printf are added to the method to log the value of the variables.
static void on_write(ble_nus_t * p_nus, ble_evt_t * p_ble_evt)
{
    ble_gatts_evt_write_t * p_evt_write = &p_ble_evt->evt.gatts_evt.params.write;

    if (
        (p_evt_write->handle == p_nus->rx_handles.cccd_handle)
        &&
        (p_evt_write->len == 2)
       )
    {
        if (ble_srv_is_notification_enabled(p_evt_write->data))
        {
            p_nus->is_notification_enabled = true;
        }
        else
        {
            p_nus->is_notification_enabled = false;
        }
    }
    else if (
             (p_evt_write->handle == p_nus->tx_handles.value_handle)
             &&
             (p_nus->data_handler != NULL)
            )
    {
        p_nus->data_handler(p_nus, p_evt_write->data, p_evt_write->len);
        SEGGER_RTT_printf(0, "Long. %d \n", p_evt_write->len);
        SEGGER_RTT_printf(0, "Write: %d %c%c%c%c . \n", p_evt_write->len, p_evt_write->data[0],
            p_evt_write->data[1],p_evt_write->data[2],p_evt_write->data[3]);
    }
    else
    {
        // Do Nothing. This event is not relevant for this service.
    }
}
You also need to import the RTT library at the beginning of the file:
#include "SEGGER_RTT.h" //JMG
When new data is written to the nus service characteristic (e.g. from Nordic's nRF Master Control Panel mobile application) the data is logged in real time in RTT Viewer

As we have explained above, you can also use RTT to input data to the application. If you want to learn more about this and other features of RTT, have a look at Nordic's tutorial and at the RTT webpage. Enjoy nRF51822 debugging!
If you found this post useful, we will appreciate that you share it through your social networks. Thank you!