In the previous post we talked about Red Bear Lab BLE Nano platform and how to program it from mbed or Arduino.
In this post we will share a detailed description of how to program and debug the BLE Nano using an open toolchain based on eclipse and GNU gcc. These notes are based on Nordic’s tutorial Development with GCC and Eclipse.
This is a long article, but if you follow it till the end, we are sure that your BLE life will never be the same.
OS and Hardware
- Windows 7 Home
- Red Bear Lab BLE Nano
- SEGGER J-Link (optional; only required for debugging)
Although we are using Windows as the target platform, the toolchain can also be installed in Mac or Linux with minor changes.
Required software
GNU CoreUtils for Windows:
- Download from here.
- Install at:
C:\nordic\dev\GnuWin32
GNU Make for Windows:
- Download from here.
- Make sure it is Installed at the same folder as GNU CoreUtils:
C:\nordic\dev\GnuWin32 - Add path to Windows PATH system variable:
C:\nordic\dev\GnuWin32\bin
GNU Tools for ARM Embedded Processors:
- Download from here.
- Unzip at:
C:\nordic\dev\gcc-arm-none-eabi-4_8-2014q2-20140609-win32 - Add path to Windows PATH system variable:
C:\nordic\dev\gcc-arm-none-eabi-4_8-2014q2-20140609-win32\bin
Nordic nRF Tools for Windows:
- Download from here (I installed v6.2.1; current version is 6.2.2)
- Install at:
C:\Program Files (x86)\Nordic Semiconductor\(mergehex.exeends up atC:\Program Files (x86)\Nordic Semiconductor\nrf51\bin\mergehex.exe) - Add path to Windows PATH system variable:
C:\Program Files (x86)\Nordic Semiconductor\nrf51\bin\
Nordic nRF51 SDK 8.x.x:
- Download from here (I installed v8.1.0)
- Unzip at:
C:\nordic\dev\nrf51_sdk_v8_1_0_b6ed55f - Update file
makefile.windowsat:C:\nordic\dev\nrf51_sdk_v8_1_0_b6ed55f\components\toolchain\gcc - Change the values for
GNU_INSTALL_ROOTandGNU_VERSION:
GNU_INSTALL_ROOT := C:\nordic\dev\gcc-arm-none-eabi-4_8-2014q2-20140609-win32
GNU_VERSION := 4.8.4
J-Link Software for Windows:
- Download from here (I installed v4.98e)
- Install at:
C:\Program Files (x86)\SEGGER\JLink_V498e
Eclipse Installation:
I had a previous eclipse installation but to avoid “legacy” configurations or incompatibility issues, I installed the proposed Kepler version that can be directly downloaded from here. Download Eclipse IDE for C/C++ Developers (it requires that JDK is already installed in PC). I use the 64-bit version.
- Install at
C:\nordic\dev\eclipse_new(eclipse.exeends up at:C:\nordic\dev\eclipse_new\eclipse\eclipse.exe) - Workspace at
C:\nordic\dev\workspace Install plugins as indicated in Nordic’s tutorial:
embsysregview
Copy
nrf51.xmlfile to:C:\nordic\dev\eclipse_new\eclipse\plugins\org.eclipse.cdt.embsysregview.data_0.2.5.r180\data\cortex-m0\NordicI could not find this file in SDK 8.1.0 so I copied it from nRF Tools installation:
C:\Program Files (x86)\Nordic Semiconductor\nrf51\incConfigure EmbSys register view as explained in Nordic’s tutorial
GNU ARM C/C++ Cross Compiler and GNU ARM C/C++ J-Link Debugging
Add
PATHvariable inWindows-> Preferences-> C/C++-> Build -> Environment. MyPATHvalue is:C:\nordic\dev\gcc-arm-none-eabi-4_8-2014q2-20140609-win32\bin
Creating and flashing a new eclipse project from the Nordic SDK examples
Nordic nRF51 SDK v8.1.0 includes makefiles to compile the example projets with GNU gcc toolchain. However, several small updates need to be done/configured in eclipse to get things working.
1. Create a new project in eclipse
In eclipse, selcet: File -> New -> Makefile Project with Existing Code
In the New Project window:
- Input whichever
Project Nameyou want Browse through the nRF51 Examples folder to the project you want to import. In my case:
C:\nordic\dev\nrf51_sdk_v8_1_0_b6ed55f\examples\ble_peripheral\ble_app_uart\pca10028\s110\armgccRemarks:
Choose board/folder
pca10028. There is no BLE Nano board defined in SDK, so we will use this board instead.Choose SoftDevice s110 (peripheral) for this tutorial. If you choose s130 (peripheral and central) some later steps in this document will need slight modifications.
Select
armgccfolder down the project path (here is where the makefile is defined/stored).
Tick C and C++ as languages
- Select
Cross ARM GCC as ToolchainforIndexer Settings
A new project should appear in the Project Explorer window with two files:
Makefileble_app_uart_gcc_nrf51.ld
2. Update ld file
Open ble_app_uart_gcc_nrf51.ld in a text editor and change the RAM LENGTH value:
RAM (rwx) : ORIGIN = 0x20002000, LENGTH = 0x2000 /* Original LENGTH = 0x6000 */
This is required because we are using BLE Nano and not PCA10028. BLE Nano has got 256 Kbytes of flash memory (0x40000) and 16 Kbytes of RAM (0x4000)
Because this project uses SoftDevice s110, the first part of the flash memory is reserved for it and the actual application starts at position 0x18000. This leaves a LENGTH of available flash memory of 0x28000 (i.e. 0x40000 - 0x18000).
SoftDevice S110 also uses 8 Kbytes of RAM memory (0x2000), so the RAM memory for the application starts at ”virtual” position 0x20002000. and its LENGTH is 0x2000 (i.e. 0x4000 - 0x2000).
Updated ble_app_uart_gcc_nrf51.ld file:
/* Linker script to configure memory regions. */

SEARCH_DIR(.)
GROUP(-lgcc -lc -lnosys)

MEMORY
{
  FLASH (rx) : ORIGIN = 0x18000, LENGTH = 0x28000
  RAM (rwx) :  ORIGIN = 0x20002000, LENGTH = 0x2000  /* JMG Original LENGTH = 0x6000 */
}

INCLUDE "gcc_nrf51_common.ld"
This file is very important and must be aligned with the target hardware platform (BLE Nano in my case) If not properly configured, application data might overwrite the SoftDevice (and generate an error when trying to merge them) or the memory stack and heap can misbehave generating runtime errors just after (re)booting the hardware so nothing seems to work after uploading the application.
The actual configuration values will depend on the presence/absence of SoftDevice, its memory requirements (flash and RAM) and the size of the HW memory (also flash and RAM). For example, If no SoftDevice is used, flash ORIGIN should be 0x00000000 and RAM ORIGIN 0x20000000.
Default/template ld files for different HW configurations can be found in nRF SDK:
C:\nordic\dev\nrf51_sdk_v8_1_0_b6ed55f\components\toolchain\gcc
3. Update Makefile
- After line
OUTPUT_BINARY_DIRECTORY = $(OBJECT_DIRECTORY)
add this new line
OUTPUT_FILENAME := nrf51422_xxac_s110
- Replace string
$<with$(OUTPUT_FILENAME)in the following lines. Change
flash: $(MAKECMDGOALS)
    @echo Flashing: $(OUTPUT_BINARY_DIRECTORY)/$<.hex
    nrfjprog --reset --program $(OUTPUT_BINARY_DIRECTORY)/$<.hex
to:
flash: $(MAKECMDGOALS)
    @echo Flashing: $(OUTPUT_BINARY_DIRECTORY)/$(OUTPUT_FILENAME).hex
    nrfjprog --reset --program $(OUTPUT_BINARY_DIRECTORY)/$(OUTPUT_FILENAME).hex
- Update line
CFLAGS += -Wall -Werror -O3
to
CFLAGS += -Wall -Werror -O0 -g3
- Update line
CFLAGS += -fno-builtin --short-enums
to
CFLAGS += --short-enums
- Look for line
$(NO_ECHO)$(CC) $(CFLAGS) $(INC_PATHS) -c -o $@ $<
and add this new line before
@echo arm-none-eabi-gcc $(CFLAGS) $(INC_PATHS) -c -o $@ $<
4. Add source files in eclipse Project Explorer window
The project explorer window is not “linked” to the makefile so changes in any of the two are not propagated to the other one.
If you want a file to be included in the compilation chain, you need to edit the makefile and include it in the C_SOURCE_FILES variable (maybe you also need to add its path to the INC_PATHS variable).
Correspondigly, files defined in C_SOURCE_FILES don´t come up on the Project Explorer automatically. You need to add them manually (compilation will still work, but you just will not be able to browse the source code in eclipse).
To add a source file to eclipse project in Project Explorer:
- Right click project name and select
New -> Folderand enterFolder Name(e.g. Application). ClickAdvanced>>and tick optionFolder is not located in the file system (Virtual Folder). ClickFinishbutton (at the bottom of the popup window). - Right click on the folder just created and select
New -> File. ClickAdvanced>>and tickLink to file in the file system. Browse to the file that you want to add (e.g.C:\nordic\dev\nrf51_sdk_v8_1_0_b6ed55f\examples\ble_peripheral\ble_app_uart\main.c)
You can add as many folders/files as you want.
5. Add include paths to eclipse project (Optional)
In order to let eclipse parse the variables and symbols of the source files, we also need to define the folders (include paths) where the different files required to compile the project are stored. This step is optional; if you skip it, eclipse will still compile the Makefile but the eclipse source file viewer will show lots of errors and warnings.
You need to include all the paths defined in the INC_PATHS variable of Makefile. To do so, right click project name in Project Explorer window and select Properties -> C/C++ General -> Paths and Symbols. Go to Includes tab, select GNU C language and Add... all the paths one by one selecting them from the File System...
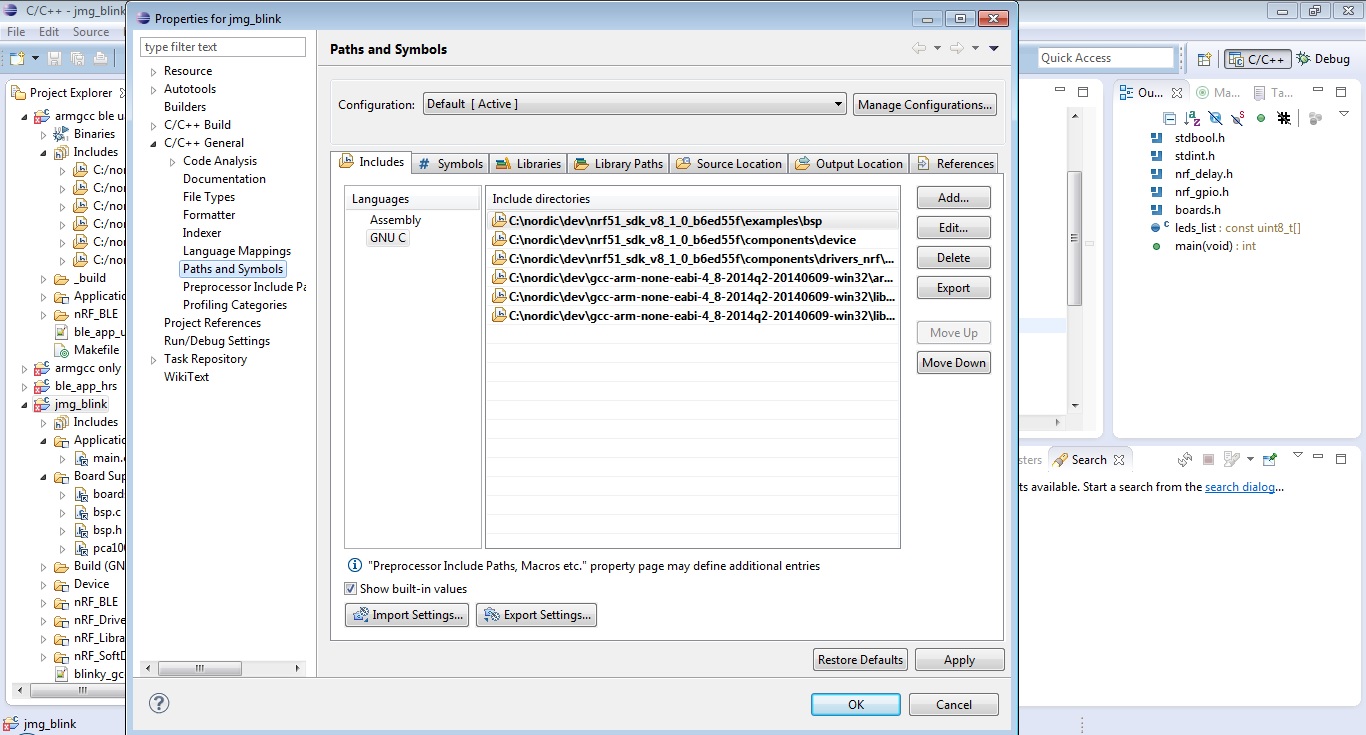
You also need to add the following paths for the C compiler (change absolute path based on your installation):
C:\nordic\dev\gcc-arm-none-eabi-4_8-2014q2-20140609-win32\arm-none-eabi\include
C:\nordic\dev\gcc-arm-none-eabi-4_8-2014q2-20140609-win32\lib\gcc\arm-none-eabi\4.8.4\include
C:\nordic\dev\gcc-arm-none-eabi-4_8-2014q2-20140609-win32\lib\gcc\arm-none-eabi\4.8.4\include-fixed
Even though you include all the paths, some header files cannot be found by eclipse and this may generate some compilation errors and warnings in the eclipse file viewer window (Unresolved inclusion for header files or Symbol could not be resolved for variables and constants). Do not worry about them. Compilation/linking only happens when you “make” the makefile. If there are real errors, they will pop up then in the console window.
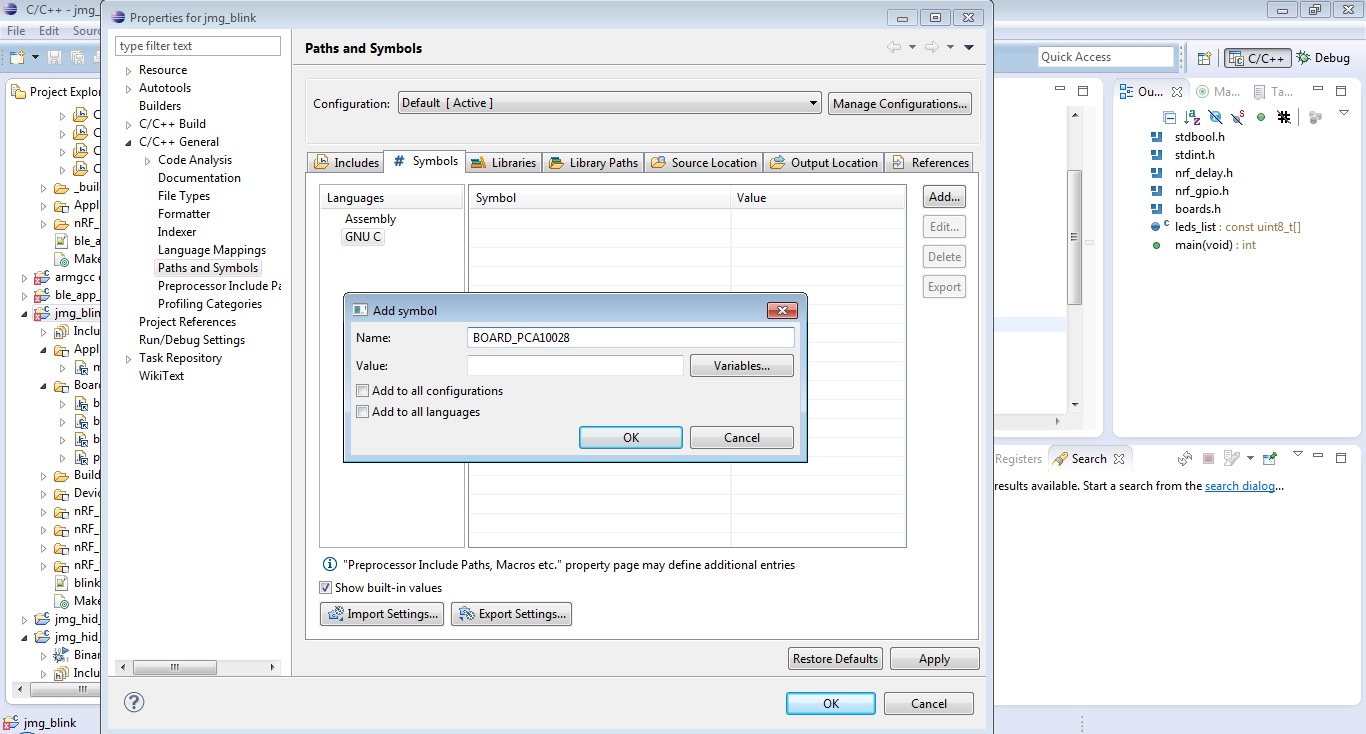
In particular the conditional compilation macros in board.h file (#if defined(BOARD_xxx)) are not properly handled by the eclipse parser. If you want to remove the errors originating from this issue, you can hardcode the definition of your board by defining the associated symbol. Right click project name in Project Explorer window and select Properties -> C/C++ General -> Paths and Symbols. Go to Symbols tab, select GNU C language and Add... a new symbol with the Name of your board (e.g. BOARD_PCA10028).
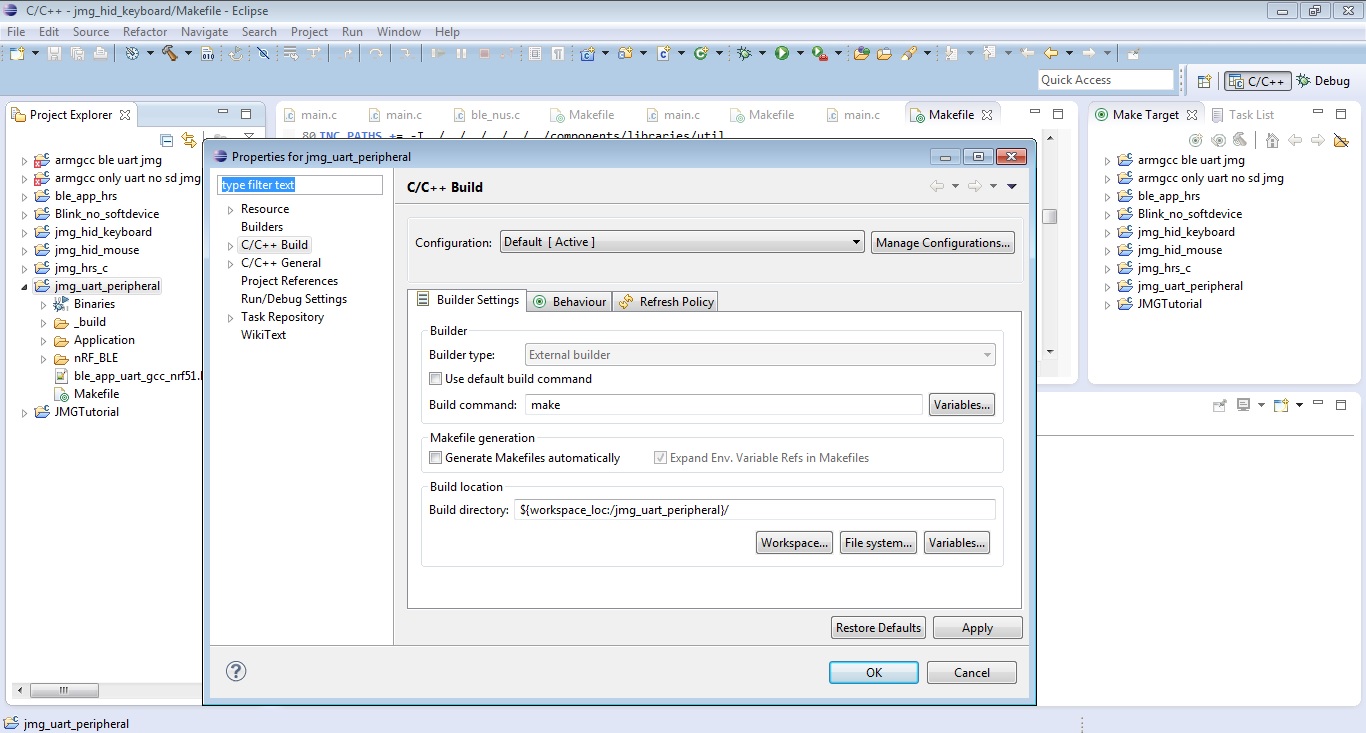
6. Update compiler settings for the project
Right click project name in Project Explorer window and select Properties.
Select
C/C++ Build. InBuilder Settingstab: UntickUse default build commandand changeBuild commandfrom${cross_make}tomake
Select
C/C++ General -> Preprocessor Include Files, Macros, etc.ChooseProviderstab.Click
CDT GCC Build Output Parserand updateCompiler command patternfrom(gcc)|([gc]\+\+)|(clang)to(arm-none-eabi-gcc)|([gc]++)|(clang)Click
CDT Built-in Compiler Settings Cross ARMand update theCommand to get compiler specsfrom
(${COMMAND} ${FLAGS} ${cross_toolchain_flags} -E -P -v -dD "${INPUTS}"
to
arm-none-eabi-gcc ${FLAGS} ${cross_toolchain_flags} -E -P -v -dD "${INPUTS}"
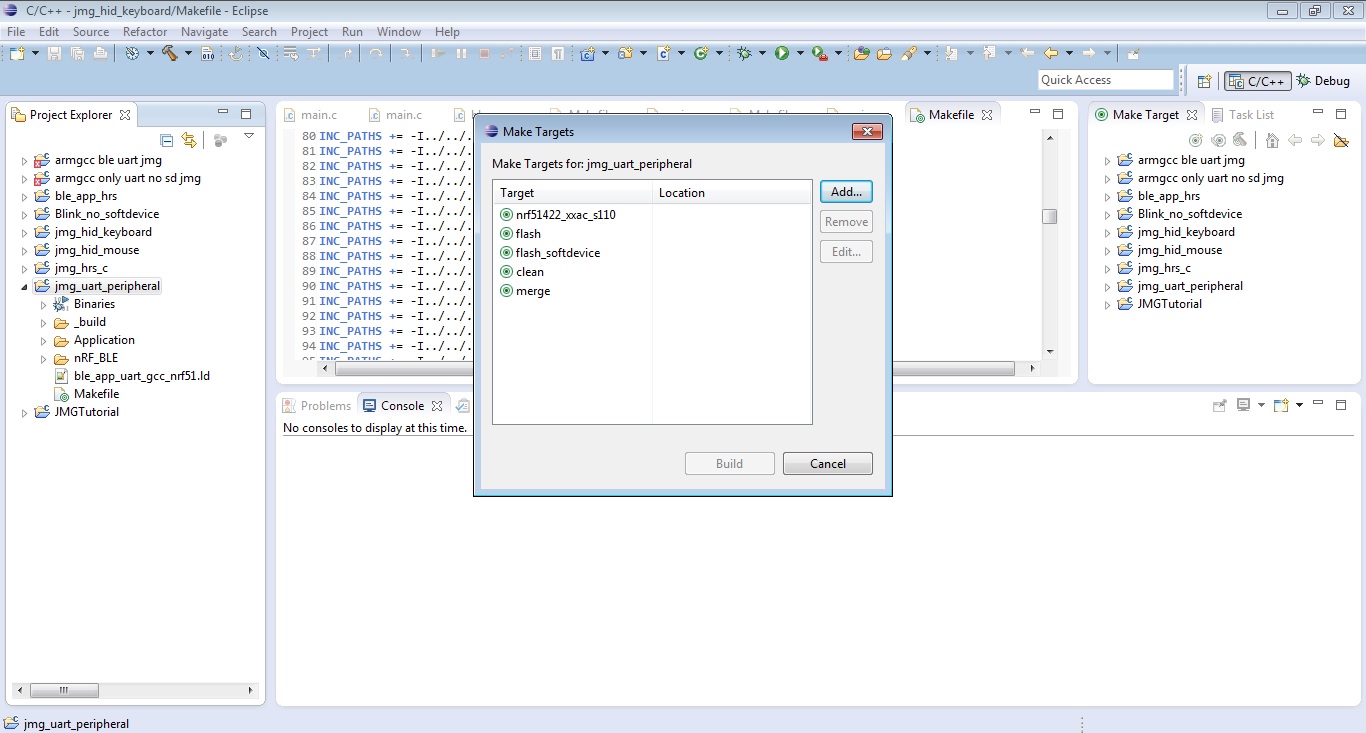
7. Create the Makefile Targets for the Project
In this step we will add to the eclipse project some of the targets defined in the makefile (targets are tags defined in the makefile that are added as a parameter to the make command).
We will configure the following targets:
nrf51422_xxac_s110: compiles the application and generates the corresponding HEX fileclean: deletes the build directory and all its files (this folder is named_buildand is created under the project folder:C:\nordic\dev\nrf51_sdk_v8_1_0_b6ed55f\examples\ble_peripheral\ble_app_uart\pca10028\s110\armgcc\_buildflash: uses NordicnrfjprogWindows app (in nRF Tools) to upload the application hex file to BLE Nano (BLE Nano must be connected through J-Link)flash_softdevice: uses NordicnrfjprogWindows app (in nRF Tools) to upload the SoftDevice (S110 in this example) hex file to BLE Nano (BLE Nano must be connected through J-Link)
Repeat the following process for each of the targets:
- Right click project name in Project Explorer window and select
Make Targets -> Create... - Type the
Target name(e.g. nrf51422xxacs110) - Leave
Same as the Target Nameticked - Untick
Use Builder Settings - Update the value of
Build commandfrom${cross_make}tomake(I do not know why thecross_makevariable is not defined or where to define it in eclipse, so I decided to hardcode valuemake) - Click
OKbutton
Optional: We will also add a new target to Makefile to merge the application and the soft device in a single HEX file. This target is only required if you do not have J-Link and need to upload the application to BLE Nano using its MK-20 USB dongle. Add the following lines at the end of Makefile:
merge:
    @echo Merging app and SoftDevice
    mergehex.exe --merge ../../../../../../components/softdevice/s110/hex/s110_softdevice.hex $(OUTPUT_BINARY_DIRECTORY)/$(OUTPUT_FILENAME).hex --output $(OUTPUT_BINARY_DIRECTORY)/merge_$(OUTPUT_FILENAME).hex
You must also add merge target to the eclipse project
To execute any of the targets, just right click project name in Project Explorer, select Make Targets -> Build…, then select the desired target and click Build button. The output of the make command comes up in the Console window/view in eclipse.
8. Compile and flash the application project to BLE Nano
Follow these steps to flash the application to BLE Nano. It can be done through J-Link or through the MK-20 USB dongle:
- (Optional) If you want you can clean the project to start compilation from scratch. Build
cleantarget as explained in the previous section. Folder_buildand its content will be deleted. - Compile the application. Build
nrf51422_xxac_s110target. The project files will be compiled and linked. All output files are created in_buildfolder. The most important file isnrf51422_xxac_s110.hex
Using J-Link
(Connect BLE-Nano to J-Link as described in the next section)
- Build
flash_sofdevicetarget to install the SoftDevice in BLE Nano - Build
flashtarget to install the application code (nrf51422_xxac_s110.hex) in BLE Nano
Note: I have experienced issues with the USB port of my PC. I am not sure why this is happening, but sometimes the J-Link USB driver will misbehave. Although I can still flash BLE Nano, the BLE Nano is not properly reset afterwards. This means that the installed application is not "visible" over BLE. When this situation happens, the green LED indicator of J-Link blinks at 10Hz.
If I connect J-Link to another PC or connect BLE Nano through the MK-20 USB dongle, I see that the application has been properly isntalled and is "visible" over BLE.
When this happens, I restart my PC and things start working again (I believe the issue is with the USB hardware of my old PC, not with the J-Link driver)
Using BLE Nano MK-20 USB dongle
Build
mergetarget. This will merge the application HEX file (nrf51422_xxac_s110.hex) with SoftDevice. The merged filemerge_nrf51422_xxac_s110.hexwill be created in_buildfolder. Note that if the configuration fileble_app_uart_gcc_nrf51.ldis not properly defined, there maybe conflicts between application and softdevice files (they may overlap) and the merge tool will generate an error.Plug BLE Nano in its MK-20 USB dongle and connect to PC. Once the BLE Nano drive is detected, drag and drop the merged file
merge_nrf51422_xxac_s110.hexto BLE Nano. When the HEX file is installed, the app will be up and running in BLE Nano and you can start using it (e.g. connecting from a mobile app).We need one sigle merged file because MK-20 dongle clears all the memory in BLE Nano before flashing one hex file.
Flashing and debugging BLE Nano with J-Link
1. Connecting BLE Nano and J-Link
In order to connect BLE Nano to J-Link, we only need five jumper wires.
- J-Link pin numbers/names: https://segger.com/interface-description.html
- BLE Nano pin numbers/names: http://redbearlab.com/blenano/
| J-Link | BLE Nano |
|---|---|
| VTref (1) | VDD |
| GND (4) | GND |
| 5V Supply (19) | VIN |
| SWDIO (7) | SWDIO |
| SWCLK (9) | SWCLK |
Use SWD and SWO/SWV (also called SWV) compatibility pinout/picture for J-Link
2. Reflashing the application code from eclipse with J-Link
Once the application has been flashed for the first time you can start using J-Link for reflashing the updates of the app.
- Update the source files in eclipse (e.g.
main.c) and save them - Recompile the app by building
nrf51422_xxac_s110target (Right click project name in Project Explorer, thenMake Targets -> Build…) - Flash the updated app HEX file through J-Link by building
flashtarget.
3. UART debugging/logging
There are some examples in the nRF51 SDK that use a UART connection as a debugging tool. UART debugging/logging is simple but it consumes lots of resources in the Nordic chip and introduces interferences when we are dealing with real time functionality like a BLE connection.
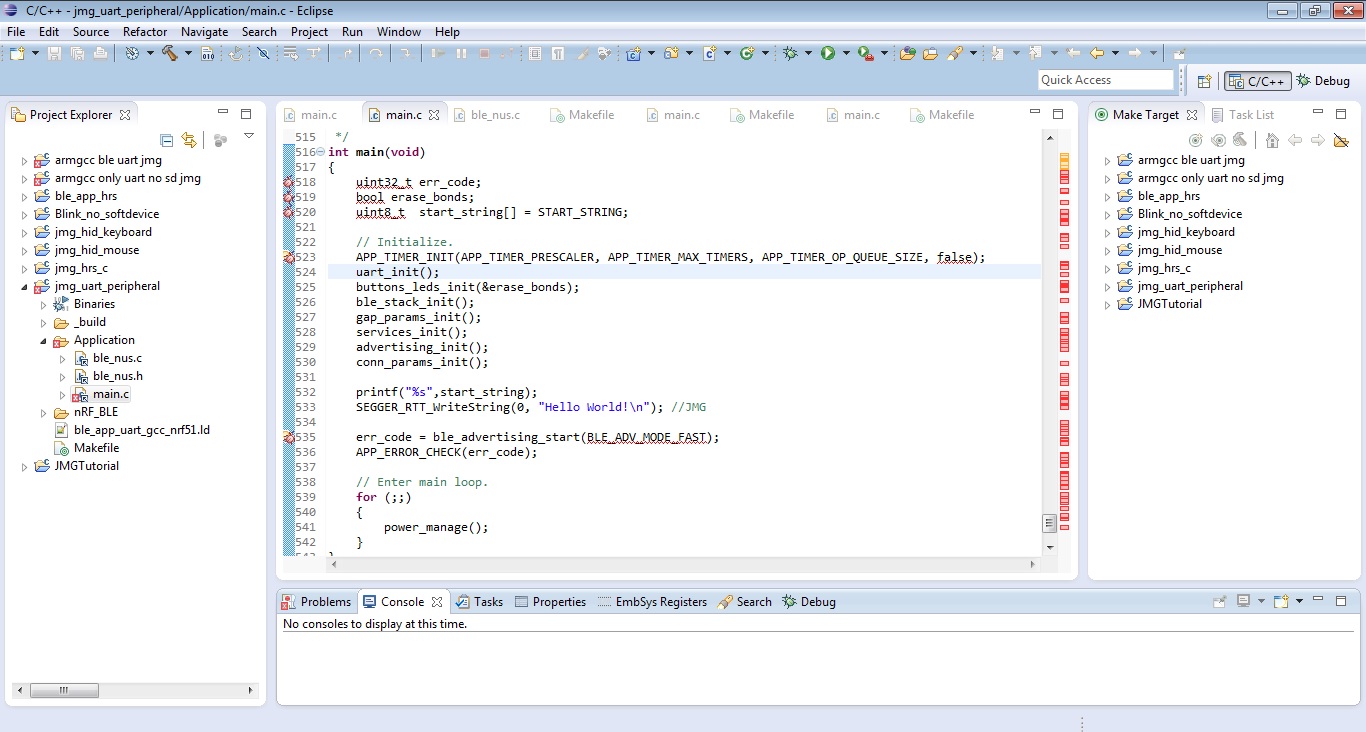
If you look at the source code (main.c) of the ble_app_uart example (C:\nordic\dev\nrf51_sdk_v8_1_0_b6ed55f\examples\ble_peripheral\ble_app_uart) the UART connection is initialised with this code snippet:
   const app_uart_comm_params_t comm_params =
    {
        RX_PIN_NUMBER,
        TX_PIN_NUMBER,
        RTS_PIN_NUMBER,
        CTS_PIN_NUMBER,
        APP_UART_FLOW_CONTROL_ENABLED,
        false,
        UART_BAUDRATE_BAUDRATE_Baud38400
    };
PIN constants (RX_PIN_NUMBER,TX_PIN_NUMBER,...) are assigned/defined in file pca10028.h (#include chain: bsp.h -> boards.h -> pca10028.h)
Although we are using BLE Nano, we select board PCA10028 and associated configuration file. We pass its name as one one of the compile parameters in Makefile (CFLAGS = -DBOARD_PCA10028)
Fortunately the UART pins of PCA10028 are the same as the UART pins of BLE Nano, so there is no need to update file pca10028.h
| pca10028 | BLE Nano |
|---|---|
| RX_PIN_NUMBER (11) | RXD |
| TX_PIN_NUMBER (9) | TXD |
| RTS_PIN_NUMBER (10) | RTS |
| CTS_PIN_NUMBER (8) | CTS |
There is an important point to highlight. The example initialises UART with hardware flow control (APP_UART_FLOW_CONTROL_ENABLED). I had an issue with this because I was using at the other side of the connection a terminal without flow control and obviously the connection did not work. I changed flow control parameter to APP_UART_FLOW_CONTROL_DISABLED and the logs started flowing straight away.
To see/display the flow information, you can use any terminal software. I am a frequent Arduino user, so I have chosen its Serial console as my UART console for BLE Nano. In this example the baud rate is 38400 bauds.
There are two options to connect the BLE Nano to Arduino console:
Disconnect BLE Nano from J-Link and connect it to its MK-20 USB dongle. In Windows Device Manager look for the assigned COM port:
mbed Serial Port (COMxx)and select it in ArduinoTools -> Portmenu.Get a USB to UART dongle (e.g. this one from DealExtreme) and use jumper wires to connect:
- TXD pin of BLE Nano to RXD pin of the USB dongle
- GND pin of BLE Nano to GND pin of USB dongle
The advantage of this second approach is that we can do UART logging while the BLE Nano keeps connected to J-Link and we do debugging through the SWD interface (more on this later)
Note 1: I did not know if my dongle was working at 3,3V or at 5V. Since BLE Nano is working at 3,3V and I was only logging in the direction from BLE Nano fo USB dongle, I did not connect the pins in the other direction (RXD pin of BLE Nano to TXD pin of dongle).
Note 2: While writing this second option, I noticed that the same mechanism works using the MK-20 USB dongle of BLE Nano. You just need to connect through jumper wires the TXD pin of BLE Nano to the RXD pin of the MK.20 dongle.You also need to connect the GND pins of both boards. No need of an additional USB to UART dongle :-)
4. Debugging using J-Link, GDBServer and eclipse
The eclipse toolchain enables on-board step by step and breakpoint debugging on the C source files. There are some limitations:
If the app execution is stopped at a breakpoint, any real-time functions running on the nRF51822 will stop and raise an exception. Typical real-time functionality is the one implemented in SoftDevice (all the methods named
sd_xxx) that is running when a BLE connection is established.When this exception/interruption is processed, the chip will reset and reboot, but the debugging session may still be “usable”:
- The values of program variables and chip registers ar the breakpoint can be read
- If the program is restarted by clicking
Resume(F8), the chip will reboot but the debugging session in eclipse can continue (e.g. if BLE Nano was connected to a mobile app, the connection will be lost but the mobile can connect again. Once connected, the BLE Nano app will keep stopping at the defined breakpoints. - If the program is restarted by clicking one of the step-by-step debugging functions (F5, F6,F7) the debugging session will disconnect and no further debugging will be possible until a new debugging session is started.
There is a possibility to do step by step debugging. When the app is stopped at the breakpoint, go the
Registerswindow (in Debug perspective) and update the value ofPRIMASKregister setting it to1. This will disable any interruptions and you can now step line by line through the code and inspect values of variables and registers. This will only work until you reach a SoftDevice method (sd_xxx) that will disconnect the debugging session and will force you to restart a new debugging session in eclipse.If you want to restart the BLE Nano app (before having reached an
sd_xxxmethod), you can reset the value otPRIMASKregister to0and click on theResume(F8) button. The chip will reboot but the debugging session in eclipse will still be on.
If the application does not use SoftDevice or if a breakpoint is set at a point where the real-time functionality of SoftDevice is not being used, step by step debugging can be done without any of the restrictions listed in the previous paragraphs
5. Configuration of eclipse for GDB debugging
Follow these steps to configure GDB debugging functionality:
Right click on project name in Project Explorer and then
Debug As -> Debug Configurations…Right click
GDB SEGGER J-Link Debuggingin the window that pops up and selectNew
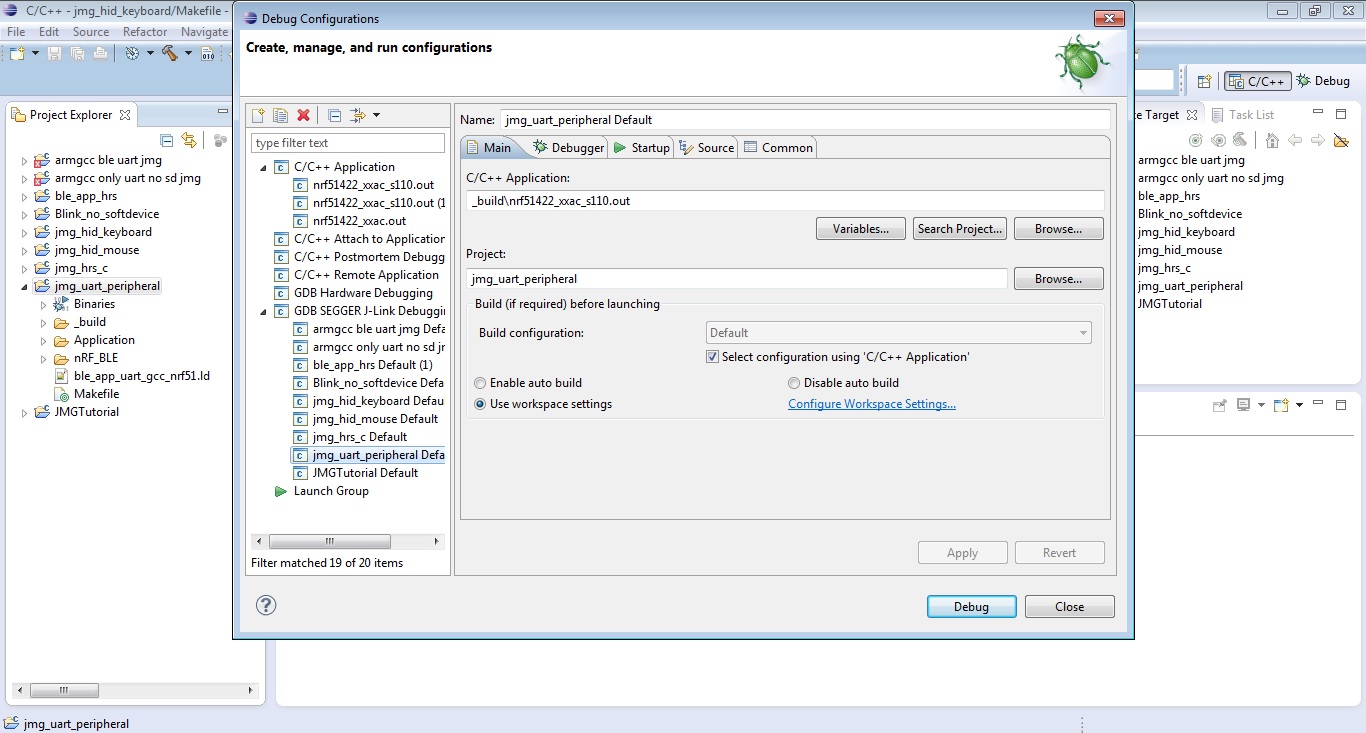
- Configure
Maintab:Projectfield should show your current project otherwise browse to select it.C/C++ Applicationfield should be_build\nrf51422_xxac_s110.outIf it is not, browse the project to find it (if compilation was successful, it should be inside the_buildfolder).
- Configure
Debuggertab:- Tick
Start the J-Link GDB Server locally - Select the path to the command line GDB server
Executablefile (in my caseC:\Program Files (x86)\SEGGER\JLink_V498e\JLinkGDBServerCL.exe) - Update
Device NametonRF51822_xxAA(I am not sure if this corresponds to BLE Nano, but it works) - Make sure that
GDB portis2331 Excutablefield (inGDB Client Setupsection) mustset to:be arm-none-eabi-gdb${cross_suffix}
- Tick
- Configure
Startuptab:- Untick
Enable SWO - Decide whether you want a “default” breakpoint just at the start of the app and tick/untick
Set breakpoint at:mainaccordingly.
- Untick
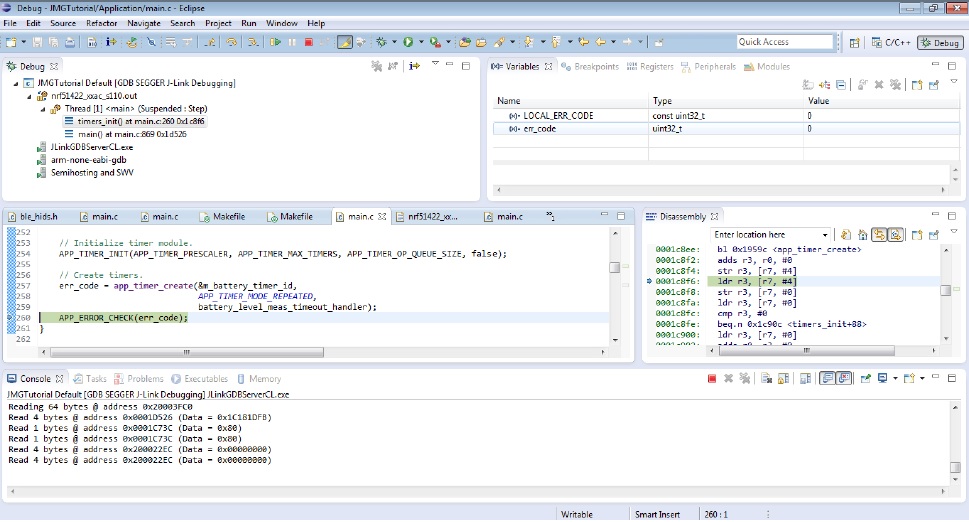
6.GDB debugging with eclipse
(Make sure that BLE Nano is properly wired to J-Link and J-Link is connected to PC)
Once the debug configuration is ready click on the Debug button. The app will be recompiled (the project will be cleaned first) and a message to change to debug perspective will pop up.
The local GDB Server (command line) in the PC should also be automatically launched.
If you configured a breakpoint in main, main.c source file will open in eclipse Debugging view (if not already open) and the program will stop at the beginning of the main method. You can start debugging now :-)
Next time that you want to debug the project, right click its name in Project Explorer and select Debug As -> Debug Configurations… In the popup window just double click on the GDB SEGGER J-Link Debugging configuration that you just created in the previous step.
Troubleshooting:
- Sometimes paths and variables are not properly configured and eclipse cannot find compile or debugging tools. Typical errors are:
“” cannot be found(a variable is not defined in the project so its value is empty) orxxx.exe cannot be found(the path to the executable file is not included in project or Windows PATH). Look for the place where the error is raised and use your imagination/google/stackoverflow to find out where the variable/path should be defined - If the project is not properly compiled, linked and installed, the initial breakpoint in
main.cfile is not reached at the start of the debugging session. Usually an empty file is shown instead with the messageNo source available for …. From my experience, most of the times this is because:- .ld file is misconfigured (check Update ld file section)
- The app has not been properly flashed in the BLE Nano (check Compile and flash the application project to BLE Nano section)
Conclusion and next steps
We hope that you have reached up to this point and you got your eclipse toolchain up and running. Let us know in the Discuss section if you had any issues following our manual or if you found alternative ways to do debugging with eclipse and BLE Nano.
In the next post, we will show how to do Real Time Terminal (RTT) debugging on BLE Nano using Segger J-Link. RTT is similar to UART logging but does not use the resources required by an UART connection so it can be used even while a BLE connection is going on. Do not miss it!
And do follow us on twitter if you want to keep updated about new articles in our blog.